Showing posts with label Ukrainian. Show all posts

Friday, March 11, 2022

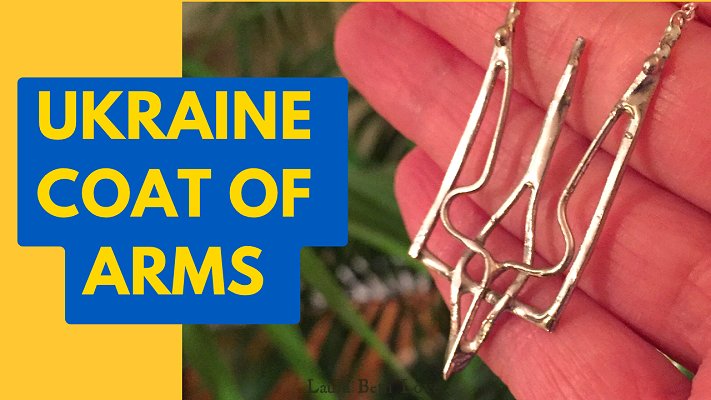
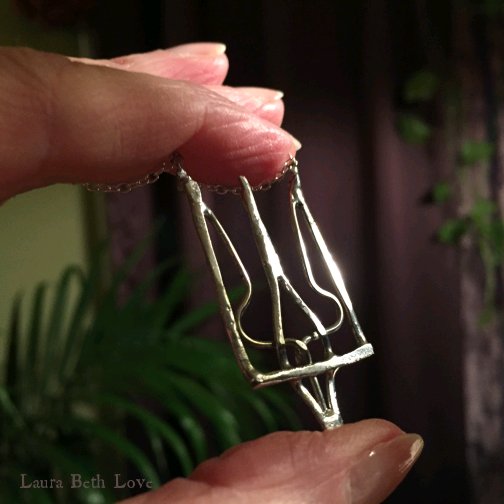
Making A Trident: Ukraine's Coat Of Arms | Soft Soldered


My grandfather Klyment Potylycki came to the United States from Lviv, Ukraine in October 1913. He was 24 years old, had $14.00 to his name, and the boat trip took two weeks.

My family has always followed Ukrainian customs and traditions as many of my long-time readers know, because I've talked about it here over the years and have shared my love for Ukrainian traditional handcrafts and cooking. 

I've written blog posts about things like how to make pysanky (Ukrainian Easter eggs) and how to make homemade perogies


My grandfather Klyment

Like most people, I am distraught over the war in Ukraine. It's heartbreaking. 

I'm not going to get into it any deeper than that because that is not the purpose of this blog. 

But I will always continue to practice and share my family traditions that have been passed down through my Ukrainian heritage. These things can never be taken away. 


I wanted to create a trident - Ukraine's official coat of arms - out of wire and solder, just for myself. I make a lot of videos that are tutorials and teaching videos. This one is different. It is just a video to watch and think about. 


Check out the video here


I hope you join me for this soft soldering video and that you find some inspiration watching.

See all of my jewelry making videos here 


You might also like:


Article copyright ©Laura Beth Love 2022 and may not be republished in print or other media without express written permission from the author. For any link updates or corrections leave correct info in comment area

Wednesday, January 17, 2018

How To Make Authentic Homemade Pierogies - Family Recipe!


There is nothing in the world better than an old family recipe of comfort food. I can't even begin to describe the amount of yum going on here today. Have you ever had a really REALLY good homemade pierogi? If you have, then you will already know what I am talking about. If you haven't, then you are missing out!

The recipe is simple, and does not take very long to make. I think a lot of people don't realize this, because if they did, you would hear about people making homemade pierogies all the time! 

For those who've never heard of them before, pierogi (aka pierogies) are a kind of dough dumpling stuffed with a filling; most commonly potatoes and cheese. They are often pan cooked with onions in butter and served with sour cream on the side.

To make pierogies you first make a dough and set it aside in the refrigerator, and then make the filling. Then you put them together, boil them briefly in boiling water, and then pan fry them or keep them in the refrigerator until ready to use. Most importantly, be sure to share some with family or friends! 

Below is our recipe to share. My daughter and I made these on Christmas eve. I figured I would snap some photos while we were making them so that we could share the recipe and process with you. Be sure to get everyone in the house to help! 


Here's how you do it:

First make the dough: 
2 cups flour
3/4 cup sour cream
1 large egg
1/4 cup olive oil
1/2 teaspoon salt (kosher or sea salt are best)

Mix all ingredients together to form a dough.

Knead dough on a lightly floured surface for a few minutes until smooth.

Wrap dough in plastic wrap and place in refrigerator for about 30 minutes while you make the filling. 


Next make the filling:
1 pound potatoes, peeled and cubed (I use 3-4)
1 cup grated sharp cheddar cheese
1 Tablespoon butter
2 Tablespoons milk
Salt and pepper to taste

Place cubed potatoes in pot, cover with water, and add 1 teaspoon salt to the water. Cover and simmer until potatoes are fork-soft, about 10-15 minutes.  Drain potatoes and add to mixer (you can also mash them by hand in the pot using a potato masher if you prefer.)
Add 1 T. butter, the shredded cheese, 2 T. milk, and salt and pepper to the potatoes and mash until smooth. 


This filling looks perfect!


Now let's make the perogies:

Roll out the dough on a lightly floured surface. 
We split our dough into two balls and rolled them out one at a time to make it more manageable.


I like to roll it to just under 1/8 in thickness. Not too thin or you will get holes in your pierogies —too thick and they will be too doughy. Practice makes perfect!


Use the rim of a glass, cup or cookie cutter to cut circles from the dough that are about 3 inches in diameter.


Use your fingers to press the dough circles a little larger if needed. Our first ones were a bit thick so we either stretched them out a bit, or re-rolled them. 


Now it's time to fill them! Get a custard cup or small bowl of water for your workspace. Scoop up about a tablespoon size dollop of filling and roll into a ball. Place filling inside your dough circle. Brush the edges of your dough circle with a few drops of water. Fold one side of your dough circle over to create a half-moon shape.


Press down on the edges to seal, making sure to also gently press the air out. Use a fork to gently seal the seams.


I place a clean linen dishcloth on a cookie sheet and place my filled pierogies on it while I work. 


These are ready for the next step - boiling them in water to cook the dough. Make sure all seams are closed and that there are no holes in the dough, or the filling will come out when you boil them.


Fill a large soup pot about 2/3 full with water and bring to a rolling boil. Add about a teaspoon of salt to the water. Once the water is boiling, carefully add your pierogies, in batches of 5 or 6 at a time, and boil for about 3-4 minutes. 

Remove the pierogies from the boiling water with a slotted spoon. I place mine in a colander that is on a plate to drain them. Next, drizzle the cooked pierogies with a tablespoon or two of olive oil so that they do not stick together! 


How I cook my pierogies:  I melt 1 to 2 tablespoons of butter in a medium sized fry pan on medium-low heat and then add a small chopped onion. 

I cook the onion slowly, stirring occasionally, until it begins to turn translucent, and then I add my pierogies and cook, flipping once or twice, until both sides are slightly golden brown. Serve with sour cream.

If you like, you can cook them for a shorter period and have softer pierogies. I like them kind of crispy and with my onions dark. It's just a matter of personal preference! 

This is how I like mine! 


Pierogie making in action!


Pin this post! 


Have you ever made homemade pierogies?
What do you think?


You might also like:


Have a great week!  
Laura

Join me on:  
Article copyright Laura Beth Love 2021 and may not be republished in print or other media without express written permission from the author. For any link updates or corrections leave correct info in comment area. 

Tuesday, March 1, 2016

Treasure Hunting: There's Gold In Them Thair Egg Decorating Supplies

One of the very first crafts that I learned how to do when I was a little girl was how to make Pysanky, aka Ukrainian Easter eggs.
I remember sitting at the kitchen table with my father when I was maybe seven years old, and watching as he showed me how he wrapped fat rubber bands around the eggs to use as guidelines for drawing the first division lines on the eggs in pencil. After our designs were penciled onto our eggs, we then would use a traditional tool called a kistka, or stylus, to draw over the lines with hot, melted beeswax. Next would come a succession of dye baths, in between each bath we applied additional wax to our eggs until our designs were complete. At last came the fun part; melting all of the wax off of our eggs to reveal the bright colorful designs below. Our eggs were never perfect, but the magic was there, and the tradition was born.

Nowadays I have a egg lathe (yes, there actually is such a thing!) to help me draw the first dividing lines on my eggs, as well as modern dyes in a myriad of colors, and even electric kistkas, and though I use all of these modern tools to help me make my pysanky, I also still use traditional tools as well. And they are becoming hard to find. 

Some of the best places to find traditional tools and supplies - for any traditional craft - is from another artist who specializes in the same craft. In an old, "dying art" (no pun intended) craft like pysanky, those artists are becoming few and far between. So where did I go to look for books and supplies? Ebay, of course. And I guess it was my lucky day, because I happened to stumble upon a newly-listed auction for an entire box of old pysanky supplies. I scoured the photos, thrilled by what I saw. Inside the box there were a few books on pysanky designs, the traditional pysanky egg dyes, old fashioned kistkas as well as a of the few newer electric ones. I emailed the seller immediately and offered him $75.00 for the box. He agreed, and soon I had my treasures. 


When my box arrived in the mail I eagerly went through each and every item. It was clear that these supplies had belonged to someone who practiced the craft for many years. There were things written on some of the pages of the books; notes about certain dye colors used for certain designs, things that only someone very serious about their art would make note of. But the biggest surprise was when I got to the bottom of the box and took out the last book. Beneath it, was an antique envelope of gold leaf! This unused package of gold leaf worth around $100.00! To me though, the real treasure was in the old pysanky tools and books. 

Want to learn how to make your own Ukrainian eggs? Check out this blog post a few years ago.
   

Do you have a treasure story to tell? 
Please share it with us by leaving a comment below! 


See all of my jewelry making videos here 


Join me on YouTube at https://www.youtube.com/laurabethlove


Pin this post!


You might also like:


Article copyright ©Laura Beth Love 2022 and may not be republished in print or other media without express written permission from the author. For any link updates or corrections leave correct info in comment area