Showing posts with label jewelry making for beginners. Show all posts

Friday, February 9, 2018

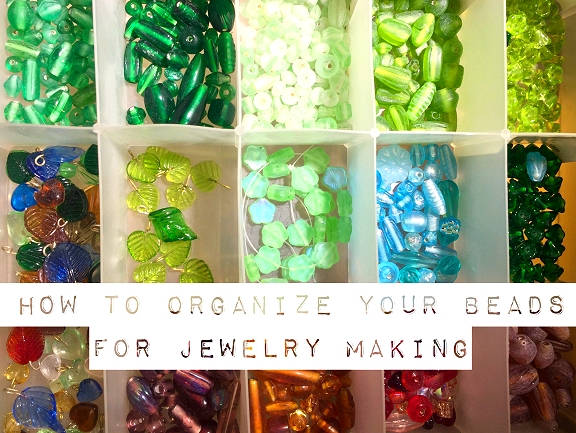
How To Organize Your Beads For Jewelry Making

When you first start jewelry making and beading, one of the first things you will discover is that you need storage for your beads and jewelry components! I think it's really important to be organized from the get go—it's a real pain to try and organize in a particular way if in the beginning you just lump all of your beads together, so start out by thinking about how you would like your beads organized, and then follow through with that. 

In this blog post I am going to share with you how I organize some of my own beads and components for jewelry making. Everyone has their own ways of doing things. The following are the things that worked best for me, but by all means, do what works best for you!

I organize my beads in a few different ways. First off, I organize by color. This is especially helpful for jewelry making, because obviously you are going to be creating things that most often are color-coordinated, so it makes sense to have all different shades of, say, green - together so that you can see the differences in hues and shades and tones, all in one box. Doing it this way makes it easy to pick just the right color. 

I also organize my beads by material. I most often use beads that are stone and glass. I have a lot of stone beads, and I have a lot of glass beads. Sometimes I mix these different material beads in one project, but most often I create something that is strictly all gemstone/stone, or all glass. 

That being said, I have one set of boxes that are all stone beads, and another set of boxes that are all glass beads. Both sets of boxes are arranged by color. I have one specific box for each color or color family.

I use standard plastic bead boxes that I bought years ago at a craft store - I think it was either Michael's or ACMoore, and I think they came in packs of 2 or 3 or 4—I forget—but my point is that you do not need anything fancy or expensive to store your beads in. The containers I use each have about 17 separate pockets for beads, which stores plenty per box.


I keep most of my boxes stacked in an old bookcase, which works great since it allows me to keep them at eye level and easy to reach. 

Here you can see a few of the examples of my organization by color family. I have one box for pinks & reds, one for yellows & oranges, one for browns & earth tones, etc. 


I also have boxes for different types of metal beads and different finishes. There are sterling silver, silver plated, copper, vintage silver, etc. 


I keep special rows of boxes that contain the things that I use most often. This makes it easy to grab them without searching. Things like pearls, clasps, sterling silver components and Swarovski crystals—I box the crystals by size...one box for 6mm, one for 4mm, etc.  


Here's a peek into one of my blue stone boxes. I have a few blue boxes—one for turquoise shades, one for true blues, one for greenish-blues, etc.


Here's one of my yellows & oranges boxes, where I store things like amber, carnelian, and citrine. 


Here's one of my pearl boxes - I try to organize them by size and shape. I peel the sticker labels off of the bags that they arrive in from the supplier, and stick those labels into the box sections with the beads. This makes it easy to see the sizes at a glimpse, and makes it easy to reorder them if needed.


Here you can see that I saved the bead-strand tags and put them in with the beads. It can be easy to forget what stone is what! Keeping the prices with the beads is essential to determining how to price your finished jewelry. Just how much did you pay for those beads? How much for the strand? How many were on the strand? How much does that come to per bead?


Here is the same photo showing the reverse sides of the tags. Here it tells you info such as: how many beads were on the strand, the name of the stone, whether it was treated (dyed, hardened, etc), and a brief description of shape and or size.


I like to keep metal components in small plastic bags to deter tarnishing, which is oxidation of the metal from it's exposure to air. 

 Here is a box of my glass beads, greens with a few other colors. 

I love green.


I keep many other supplies in these photo boxes that you can buy at most craft stores (I think I bought mine at ACMoore.) These are great for storing wire, chain, jump rings, and headpins—things I buy a lot of.


And finally, no matter how organized I keep my supplies, my workspace usually looks like this! 

I hope you enjoyed this peek into my bead storage and organization and hopefully you were able to take away a good hint or two for organizing your own beads and jewelry making supplies! Happy jewelry making! 


Pin this post! 


Have a great week!
 Laura


Article, images, and designs copyright ©Laura Beth Love for Dishfunctional Designs™ 2018
all rights reserved

Wednesday, January 31, 2018

How To Get Started Making Torch Fired Enamel Jewelry


(photo via Rings n Things)


I recently came across a great article from Rings n Things that has some useful information about getting started with torch fired enameled jewelry. In it you can learn some great tips about the colors and different types of enamels, enameling safety, metal compatibility, preparation, application, torch firing and finishing your jewelry. 

Years ago I purchased a small table top kiln and played around a bit with enameling small silver heart charms, but as usual, I got distracted and soon my attention was drawn elsewhere, my little kiln forgotten. But now enameled jewelry is really making a comeback, along with the increasing popularity of copper jewelry (copper is great to enamel on in case you didn't know), so I just might pull out my enameling supplies and give it another go.  

You don't need a kiln to make enameled jewelry—you can do it with a small torch and a few other supplies—so it just might be more accessible than you might think. 

Of course you need to make that initial investment in whatever tools are essential to the craft - but that is they way it is no matter what craft you are going to take up. 

So now I think I'll go pull out my dusty box of enameling supplies and maybe give it another go. How about you?


Have you ever made enameled jewelry? 

Would it be something you would like to try?


Have a great week!
 Laura


Article, images, and designs copyright ©Laura Beth Love for Dishfunctional Designs™ 2018
all rights reserved

Friday, June 30, 2017

Easy Beginner Tutorial: How To Make A Basic Elephant Necklace


I remember when I first got the idea to make jewelry. When it came to the technical aspect of tools and components, as a beginner, I had absolutely no idea where to start. 

I had been making stained glass and also making mosaics out of stained glass and vintage broken china, when I started setting aside certain china shards that I would come across that just seemed too special to be put into a mosaic. I knew they had to be the main feature in whatever way they were to be recreated, so I set them aside to hopefully one day turn them into jewelry. 

When the day came to turn my soldered china prototypes into actual wearable pieces of jewelry, I had to teach myself everything. Learning what the different components were and what they were used for, learning about different metals and chains and wire gauges was a bit confusing at first, but I just took my time and figured it out the best I could. Then came the tools. Some looked like they were from another planet! I quickly found out that there were a lot of tools that I really DIDN'T need, and that the most important thing I needed was my own creativity and lots of good lighting. 

But the whole point of this blog post is that we all have to start somewhere. When you first start out, even the most simple necklaces can seem confusing when you're not sure what goes where. 

In this beginner tutorial I will show you how to assemble a simple chain necklace with a chain, clasp, and charm. I chose an elephant charm for my project. You can use any type of charm you like. This basic assembly will become second nature to you quickly as you create more jewelry. 

Supplies needed:
Jewelry chain in desired length (I use 18")
Lobster-claw style clasp
(1) 4mm jump ring
(2) 5 to 5.5 mm jump rings
2 pair of basic jewelry pliers (sometimes called chain nose pliers)


First, assemble your supplies. It's always good to have extra jump rings in case you accidentally bend one out of shape. Work in a well-lit area. Reading glasses work great for helping to see small components! 


First we will add a jump ring to your charm (AKA your component, or your focal piece). Charms sometimes come with jump rings already attached. Yay!  Sometimes they don't. So we'll easily add our own. Important: Make sure your large jump ring that you are going to attach to your charm is big enough to fit onto your chain. If it isn't, get a larger jump ring, or get a smaller gauge chain. 

First we have to open the jump ring to thread our charm on it. We always use two pairs of pliers to open jump rings. Using two pairs of pliers is important because the jump ring needs to be twisted with both ends turning away from each other (see photo above). 

To open your jump ring, hold the jump ring with the seam side up, use one pair of pliers in each hand to grip the jump ring ends where they meet. Now use a small twisting motion to separate the ends of the jump ring so that one end goes up and one goes down (see above photo). The most important thing is that you do NOT pull the ends apart from each other left to right or you will land up with a misshapen jump ring that will never close properly. 


Once your jump ring is open, thread your charm onto your jump ring as shown in the photo above. 

Now close the jump ring the same way you opened it - using two pair of pliers, one in each hand. Just grip the ends of the jump ring and carefully twist them back together until they meet. If you hear a clicking sound when the ends come together, that's good! 


Now thread your charm onto your chain by putting the chain through the jump ring. 


To finish your necklace all you need to do is attach your clasp and jump rings to your chain ends as shown in the above photo. To do this, open your smaller (4mm) jump ring using the same technique above, and thread the loop that's on the bottom of your clasp onto the jump ring. Then thread the end of your chain onto the same jump ring and then close the jump ring as we did above. 

Now attach your last, larger jump ring to the opposite chain end. This jump ring will serve as the catch for your clasp. That's it! You've put together your first simple chain necklace. 


What did you think? Easy? Maybe next time we will add some coordinated beads...

Let me know what you'd like to see!


Have a great week!
love,
 Laura


My broken china jewelry is always available for purchase at https://www.etsy.com/shop/dishfunctionldesigns


article copyright ©Laura Beth Love 2017 all rights reserved

Friday, October 18, 2013

A Beginner's Guide To Beads For Jewelry Making


If you are new to beading and jewelry making, you will soon discover that there are an enormous variety of beads available for use in your projects. There are literally thousands of different types of beads made from all different types of materials, and they come in all different sizes! Who would think that something as small and simple as a bead could cause such overwhelming confusion? Fear not, and follow this beginner's guide to jewelry making beads.


MATERIALS
Beads are made from a huge variety of materials. From stone to bone to precious gems, there is bead for every need! Below is an overview of some of the most popular materials that beads are made from.


METAL BEADS
Metal beads can be broken down into two categories: precious metals and non-precious metals (sometimes known as base metals). Precious metal beads include those made from 22k, 18k or 14k gold, vermeil (sterling silver plated with a thick coating of gold), gold filled (silver or other base metal electroplated with gold) and sterling silver. Base metal beads include copper, brass, nickel, bronze and pewter. Some older pewter beads contain lead, which should be avoided. When purchasing pewter beads, be sure to look for beads that are labeled as lead-free.


NATURAL STONE BEADS

Natural stone beads are considered either precious or semi-precious depending on the type of stone they are made from and whether or not the stone is considered rare or valuable. Precious stones are sometimes referred to as gem stones and although there are a variety of different types of precious gems, only few types are actually made into beads. This is sometimes due to the softness of the stone, such as that of an opal, or because of the rarity of a stone, such as a diamond.


Rubies, sapphires, emeralds and tanzanite are a few types of precious stones that are available in bead form. Other precious gems that are not made into beads are instead cut (faceted) and polished and placed into settings or made into cabochons. Some of the varieties of semiprecious gemstone beads are: amethyst, citrine, moonstone, tiger eye, quartz crystal, rose quartz, turquoise, lapis, apatite, iolite, aquamarine, topaz, peridot, malachite, jade, garnet, carnelian, tourmaline, fluorite, jasper, and agate, among many others.


Many gemstone beads undergo a variety of chemical or heat processes that are meant to harden or enhance the colors of the gems. Some of these processes include bleaching, dyeing, hardening, filling, enhancing, oiling and stabilizing.
In 1982 the American Gem Trade Association established a code of ethics for the jewelry industry pertaining to enhanced gem materials. This code of ethics demands that any retailer must fully disclose any and all enhancements made to a stone or gem. If you plan to sell any jewelry that you make, you must also disclose to your customer if any of the stones in your jewelry have been enhanced.

PEARLS
Pearls are always a popular beading medium. Pearls are natural or cultured, and farmed in either saltwater or freshwater. Some common shapes of pearl beads include round, potato, baroque, rice, seed, stick, and coin. Pearls are graded to discern their quality. For example, a pearl that is graded AAA will have an excellent luster, be free of blemishes, be very smooth and have a thick nacre. A pearl that is graded C, on the other hand, may have some blemishes and not be as smooth or lustrous as a higher graded pearl. Pearls are often bleached and are available in a large variety of dyed colors.


OTHER NATURAL MATERIALS
Beads are available from many different types of natural materials including wood, bamboo, horn, bone, seashell, coral, seeds, and amber (petrified tree resin). Some of the varieties of coral, shell and bone (usually cow, goat and water buffalo bone) are often bleached and dyed. Amber is always hardened.


GLASS BEADS
Glass beads have been used in jewelry since ancient times. Nowadays, there are a vast variety to choose from. Some popular types include pressed glass beads (also known as molded glass), lampworked or flameworked glass beads, dichroic (pronounced die-crow-ick) glass beads, millefiori glass beads, seed beads and frosted glass beads. Some glass beads are marketed as "glass pearls." These beads are not true pearls but are glass beads coated with paint or an acrylic coating that makes them resemble pearls.

CRYSTAL BEADS
Known for their fabulous sparkle, crystal beads are machine cut glass beads that have an extremely smooth surface. They come in a wide variety of colors and shapes. Some of the most popular shapes are faceted cubes, tapered (diamond shaped), rounds, saucers, and teardrops.


ACRYLIC BEADS
Acrylic beads are made from different types of plastic and are usually the most inexpensive type of beads. They are available in almost any color and shape imaginable and are sometimes made to look like pearls, gemstone and stone beads.


OTHER/MISCELLANIOUS BEADS
Some more unusual beads are made from paper, clay, glazed ceramic, polymer clay, PMC (preciousmetal clay), as well as found objects and repurposed/recycled items (such as dice and coins).


BEAD SIZES
Bead sizes range from tiny seed beads to large, centerpiece beads known as focal beads. Most beads sold today are measured in millimeters. One exception is the seed bead, which is measured in aughts. Some common sizes of seed beads are 11/0 (2-2.5 mm diameter) and 8/0 (3-4 mm diameter). One important thing to consider when buying beads is the size of the hole. Some beads (namely pearls and gemstone beads) have holes that are quite small and will not easily accommodate a stringing medium that has too wide a diameter. One handy tool used to remedy this problem is called a pearl reamer. With it, you can enlarge the bead's hole.

SHAPES OF BEADS
The shapes of beads that you can buy are nearly as varied as the materials they are made from. Some standard shapes include round, briolette, teardrop briolette, tube, faceted rounds, twisted, rondelle, disc, barrel, flower, leaf, heart, square, diamond, drum, oval, long oval, flat oval, cone, cube, donut, heishi, coin, fan, slab, carved, nugget, pebbles and chips.

HOW BEADS ARE SOLD
In most cases, the packaging or manufacturer will determine how beads are sold. Some of the more expensive precious metal and gemstone beads are sold individually. Other beads will come packaged by quantity such as 4, 10 or 50 to a package. Many wholesalers offer beads by the gross, which is a quantity of 144 beads. Certain types of beads such as seed beads are sold by weight. For example, a 4-gram tube of size 11/0 seed beads will contain approximately 800 beads. Many pearl and gemstone beads are sold by the strand, and are purchased temporarily strung. When buying pre-strung beads, be sure to note the length of the strand. One common length of pre-strung beads is 16 inches. Others are sold in strands of only four inches. The number of beads that you will receive from a strand depends greatly on the size of the bead and also whether there are spacer beads strung between the beads. Spacer beads are inexpensive plastic or glass beads whose purpose is to display the purchased beads and to separate them so they do not rub against one other.


What's your favorite type of bead?


Pin this post!


You might also like: 


Have a great week!
Laura

Article and images copyright ©Laura Beth Love 2013 and may not be republished in print or other media without express written permission from the author.