Showing posts with label summer crafts. Show all posts

Friday, June 19, 2020

Friendship Bracelets As Textile Arts: Maturing A Childhood Trend


https://www.instagram.com/rickweaves/
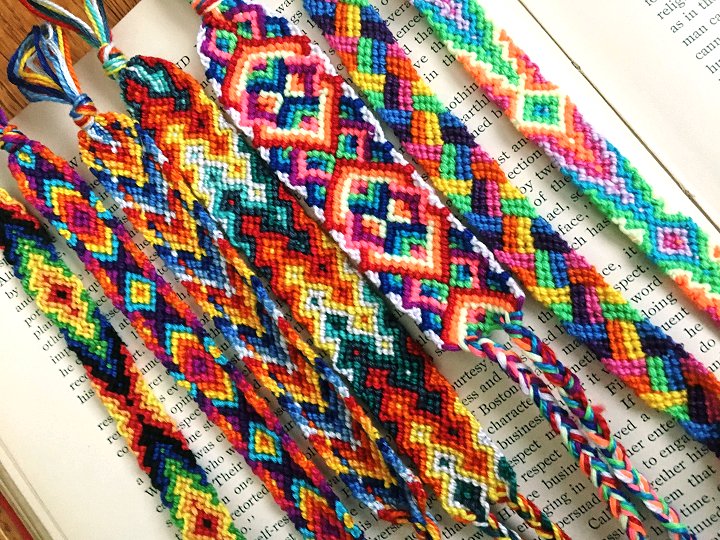
Multicolored bracelet array

I'm super happy to share with you a guest blog post today from my daughter Erica, who is an amazing weaver! She is also a member of the class of 2020, and with her school year cut short, has gotten in a lot of practice making her beautiful woven bracelets.

I grew up spending time with my cousin, Andrea. Being a few years older than me, she would always be the one who was up on trends first, either from the big kids at school or summer camp. 

I was about 8 years old when she taught me how to make friendship bracelets in my grandmother’s sunny living room.

Simple twisted and green variegated "carpet" bracelets


Bright Aztec-inspired bracelet

Andrea showed me over and over again how to make a forward knot with embroidery thread, the most basic building block for a bracelet. From there, I mastered what we called a “carpet” bracelet. Soon enough, I amassed a collection of rainbow threads to knot with for the duration of that special summer.


Double arrowhead with natural color palette

Now at 18, I’ve taken up this craft again, finding now more than ever how meditative and rewarding knotting friendship bracelets is. Working through a pattern to create a beautiful and unique textile clears the mind and helps you relax like no other creative hobby.


You can create an endless variety of color combinations and different patterns

Like many of you, my town had been under stay at home orders for over three months during the Covid-19 pandemic. I spent this time building my repertoire of bracelets and opening my own small business through Instagram.

I'm glad to have used this tough and uncertain time to channel my energy and put something beautiful into this world!

Pastel sunset chevron

Weaving friendship bracelets is a hobby that transcends childhood. As I spent more and more time knotting these bracelets, I found new and complex patterns that could challenge me and take my skills to the next level. The simple knots can be expanded from forming bracelets to bookmarks, or even more ambitious projects like belts, guitar straps, necklaces, or even wall hangings.


My favorite bracelets!

It is never too late to create friendship bracelets! I’d suggest that a beginner should purchase a plastic box for storing string, paper or plastic bobbins to wind the sting onto, and multicolored embroidery thread. 

The great thing about handwoven bracelets is that they are accessible. Even the most beginner-level knotter can create a fantastic, wearable piece and personalize their projects.


One-of-a-kind key chains

Hogwarts house inspired bracelets

All of the bracelets shown are available for purchase through my Instagram shop rickweaves.

Looking for a special custom bracelet with you own favorite colors? Message me @rickweaves and I'll make a special one just for you! Come and see all of the other styles and patterns I have to offer! ~ Erica


What do you think?


Have a great week!
Laura

Join me on: 


Article copyright ©Laura Beth Love 2020 and may not be republished in print or other media without express written permission from the author. For any link corrections please leave correct info in comment area.

Monday, June 10, 2019

Creative Inspiration From Vacation: 5 Of The Best Summer Crafts To Try

Crafting in the summer is ideal since we usually have more leisure time to spend on fun projects and we are (hopefully) more relaxed than we are during the rest of the year. One of the biggest reasons I look forward to a vacation every summer is the solitary time I get to spend collecting my creative thoughts in a relaxing environment. Inspiration always seems to strike while I'm on vacation, whether just sitting on a beach people watching or camping in the mountains. 

This inspiration is always two-fold. When I'm relaxed and in a different physical environment my mind seems to loosen the chains around the thoughts of what I am usually making (jewelry) and I give myself the freedom to explore new and different things. In a nutshell: Not only do I come home inspired to experiment with a brand new craft, but I also always seem to also have a brand new perspective on my usual work. For me, vacations breed ideas.

Whether you're tacking a project solo or crafting with a partner or kids, summer is the perfect time to try something new. Here are my picks for five great summer crafts to try out during the warm summer months:


1. Tie Dye

Summer is definitely the best time of the year to try out any crafts that verge on the messy side, and tie dye certainly is one of them! Using a large amount of permanent dyes indoors can be a recipe for disaster, but if you have space outdoors to create, then that changes everything! What you will need: You can purchase tie dye kits at most craft stores, and these are great because they will usually have most of the supplies that you will need right in the package, or at least a list of additional items that you may need printed on the outside of the package. 
If you can, work outside on a picnic table or patio table, but move it onto the grass, as drips of dye and soda ash can stain your patio surface. Use a plastic table cover too, rubber gloves, and have old towels and paper towels handy for easy cleanup. Basic supplies include: cotton t-shirts, socks, or other material to dye, rubber bands, tie dye dyes, buckets, soda ash, and water. Here's a basic tie dye tutorial to get you started. 


2. Paint Pouring

Paint pouring AKA acrylic paint pouring AKA "dirty" pouring are all terms for the same thing, which basically is a craft where different colored acrylic paints and a couple other additives are "layered" by being poured one by one into a plastic cup and then afterward slowly poured over a canvas or other surface. The layered paint in the cup, aided by the additives (most often silicone or Flotrol paint additive) creates beautiful patterns as it flows across the surface of the canvas. No paint brushes are needed, though crude tools can be used to help gently guide the paint (think paint stirrer or pallet knife.)

Supplies are for the most part inexpensive and consist of acrylic craft paints, lots of white acrylic paint, an additive like the ones I mentioned above, and canvases. The paint-covered canvas is then set aside for days or even weeks until it is fully cured or dried. 

Why is this craft great for summer? Warmer temperatures aid in drying the paint faster, and the ability to work outdoors or in an area such as an open garage helps to lessen the mess and the paint odors. 


3. Rain Chains

Making a rain chain is a mix between a craft project and a DIY home project - you can be creative with the process, they're fun to make, and they are a DIY improvement to your home or garden and outdoor landscape. What's a rain chain? A rain chain is a creative and aesthetic alternative to collect rain water and/or direct rain water away from your home, kind of like a downspout does. 

You can make a rain chain with different types of chain, or you can get creative and use other objects linked together to create a rain chain. Some ideas for rain chains: vintage flatware such as spoons or forks, wine bottles, plastic bottles, small containers, heavy gauge wire and rocks, crystals, or beads...what creative ideas do you have for interesting or unusual materials that you could use to create a rain chain? Check out these great rain chain ideas to get you started!


4. Seashell Crafts & Jewelry

Natural materials abound outdoors, and seashells  especially are summer-related finds fit for creative ideas. No longer seen solely as kitsch, shells and other organic materials are once again on the uptick for creative crafts, jewelry and home decor—they're just being used in new, innovative ways.


Jewelry is forever a popular choice, and now combined with paint or resin takes on a whole new look. Embellished shells, whether done with permanent marker or metallic spray paint, make pretty bowl-fillers and can be used in lots of other projects. 

Try using Micron pens to create designs like the ones shown above. Coat them with sealant when finished. To jump-start your creativity, check out my seashell jewelry projects in my book, Boho Chic Jewelry: 25 Timeless Designs Using Soldering, Beading, Wire-Wrapping and More.


5. Upcycled Flea Market & Yard Sale Finds

Summer is the perfect time to get going on those upcycled creations using your flea market and yard sale finds. The last thing you want is to have that great "find" from someone else's yard sale sit around in your garage or basement only to eventually become your own future yard sale item! 

So what is it that you had planned on making? A garden chandelier of mason jar planters from an old ceiling fixture? An old, outdated metal globe transformed into chic painted home decor? No matter what the project, summer is the perfect time to clear out some of those items by upcycling them into something new and putting them to good use. What project will you work on this summer?


You might also like: 


Have a great week!
Laura

Article and images copyright ©Laura Beth Love 2020 and may not be republished in print or other media without express written permission from the author.

Tuesday, June 30, 2015

How To Create Awesome Tie Dye T-Shirts


Summer is the perfect time to enjoy arts & crafts outdoors. There's nothing better than to be 
outside on a beautiful sunny day, making something creative while at the same time 
keeping the mess out of the house! My boyfriend is a tie dye pro, so when he 
suggested we get some supplies and plan a day to make our own tie dyed shirts, I couldn't 
have been more thrilled. Yay! Sunshine and art and kids and fun!

Collecting our supplies...
First we looked at thrift stores for t-shirts and other things that we might want to dye. I was 
looking for a white cotton Boho style skirt. I didn't find one there, but I did find a 
Philadelphia Phillies t-shirt for $1. Score! Next we bought a few 100 percent cotton t-shirts 
at our local crafts shop for around $3 each, and a few white cotton bandannas.  
I also found a lace-edged tank top and a nice silky v-neck top at Target that 
I added to my "to-dye" stash, so I would have a little variety in my styles of tie dyed shirts. 

For dyes, we bought a multi-pack that contained 12 plastic bottles that already had the dyes
in powdered form inside of each bottle. Since there were going to be five of us making 
shirts (us along with our kids), we figured the big set with 12 colors was the way to go. The 
dye kit contained 12 plastic bottles with one color of powdered dye already in each bottle, so 
all we had to do was add water to the bottles and shake them up. The kit came with 
plastic table cover, but you can use any kind of plastic drop cloth or old plastic tablecloth 
to protect your work space. The kit also contained a few pairs of plastic gloves, rubber bands 
to "tie" our shirts up with, and some general instructions for how to prepare the dyes and 
make a few different designs. We purchased a box of soda ash mix separately (in the craft 
store where the tie dyes are located) and used our own plastic bucket to mix that up 
according to the package directions. The first thing we did before we started was soak all of 
our t-shirts in the soda ash and water mix for 20 minutes. The soda ash helps the dye 
adhere to the shirt better and is supposed to help the dyes stay nice and bright. Check it out! 


 Soaking our shirts in soda ash and water - we had a lot of shirts and they soaked up all
of the water! We actually had to use two separate buckets. Next time if we again dye
a lot of shirts, we will have to use two boxes of soda ash.


Our work surface, an outdoor table covered with a plastic table cover, gloves,
and our directions.


Each bottle contained powdered dye in a squirt bottle. All we had to do was measure water 
and add it to each dye bottle, and then shake them up until all of the dyes were dissolved. 
Easy!


He shows how two spiral designs are created. He pinched the material in two places
with his thumbs and index fingers, and then twisted the material...


...and kept twisting until the material by turning his fingers until the material was all  bunched up...


...and then he secured it or "tied" it, with rubber bands to keep the material bunched up.


Next comes the dye! You just squeeze it from the squirt bottle onto the fabric, saturating
the fabric. Once we had the dyes on, we set them aside on the grass for a couple of hours
so that the dye could soak into the fabric and really permeate it. If you look closely at this
photo you can see how his two spirals look like circles.  You apply the dye in a wedge shape
or in a line through the perimeter of the spirals or "circles" to achieve the finished spiral tie 
dye design (see below).


The end result!


To do a striped dye design with vertical or horizontal stripes, this bandanna was 
folded lengthwise in an accordion or fan fold technique...


...and then she applied her chosen dye colors, one next to the other. Don't forget to wear gloves! 


The end result


This shirt was made with same pattern technique.


Sorry for the blurry photo! This random dot shirt turned out great! To make this,
she just applied random drops of dye to the shirt and then laid it flat - no tying!


After a sitting for a while, the dye spreads out and blossoms.


The end result! 


Deciding what colors to choose...there are so many possible combinations!


A t-shirt twisted into a spiral, ready to be tied with rubber bands and dyed!


Tying the t-shirt up with rubber bands before applying dyes. You don't have to tie the shirts
with rubber bands, but they will help the shirt to keep its shape. 


Green and blue shirt...here green and blue are applied in a wedge shape,
 and then a little yellow and just a couple drops of purple are added...wait till you see this one...


Awesome! To create this design, he twisted one spiral, beginning in the center
of the shirt.


We laid our shirts on the grass to give the dye some time to seep in and works its magic
After an hour or two, we removed the rubber bands, opened up the shirts, and then laid
 them all out on the grass for another hour or two before we rinsed them out.


I really wanted him to dye one of my shirts for me, so he did this one for me...


He twisted two spirals into this shirt...


Beautiful! 


Here are a few more of our creations...

He made this one by spreading the shirt out flat, but instead of creating one spiral on the front of the shirt, the shirt is instead laid out sideways so that one side/sleeve/armpit of the shirt is facing the table and the opposite side is facing up.


After a few hours we rinsed each shirt out very well with a hose until all of the
dye was rinsed out and the water ran clear. Now our shirts are ready to wash and wear! 


Pin this post! 


Have a great week!
Laura

Join me on: 


Article copyright ©Laura Beth Love 2019 and may not be republished in print or other media without express written permission from the author. For any link corrections please leave correct info in comment area.